Products
Our Newsletter
|
280 Motor Rotor Replacement Steps for replacement of the Mabuchi RC280 motor rotor and end bell on SmartWinch 280 models. These can be purchased from us (send email from the contact us page) or from a hobby shop that stocks Graupner Speed range of motors. We can supply the replacement is desired or you may procure one yourself. The Graupner Speed 280 6v is the recommended replacement. The Graupner part number is #6328. This is a rebadged Mabuchi RC280. If you find a Mabuchi, it must be the RC280 and not RE280. The RE280 does not have Carbon brushes and will last a very short time. Use this guide to show how to remove the end bell and rotor from a new motor. Don't be tempted to just replace the entire motor. While there may well be a few more steps using the method below, it is easier than trying to replace the case as well. |
|

|
Pry off motor pinion.
Ensure pinion meshes with gear as it goes past second gear on top shaft. |

|
De solder motor leads |

|
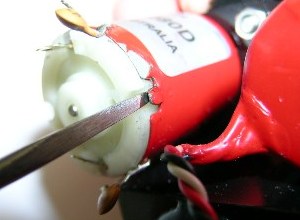
Desolder capacitor from motor terminal.
Leave other cap lead attached to case. Carefully bend cap out of the way. |
|
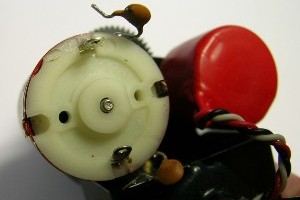
Bend end bell retainer tab out straight.
Note capacitor is also bent out of way of end bell. |
|
Leads removed, caps out of way and retaining tabs straight. Ready for end bell removal |
|
Push on drive end of motor shaft and pull end bell out of case.
Don't worry about brushes as these are to be discarded. |

|
With end bell removed, pull rotor out. |

|
Prepare the new end bell by clipping the brushes out of the way. This pic doesn't show it very well but there is a small peg to retain each brush holder. Use small screwdriver to clip the brush holder over the peg. |

|
New rotor in place. Before inserting the new rotor put a drop of light machine oil on the drive end of the shaft. Once in place, place another drop on the non drive end. The non drive end is the end that can be seen in this picture. |

|
Note small notch in motor case near corner of black box in the previous picture.
Note small key in plastic end bell in this picture. Hard to see in this pic but it's near one of the two terminals. |

|
Place new end bell in case mating notch and key.
Bend tabs back to retain end bell. |

|
Carefully bend caps back in place |

|
Solder cap and motor leads to terminal.
IMPORTANT! Red lead to top of motor. |
|
See the two small holes at right angles to the terminals? Push a pin or similar into these holes till you hear a "click" when the brush holders drop from the retainer pins. This puts the brushes in place on the commutator.
I've reused an earlier pic here as this is the best one showing the holes. |
 |
Refit motor pinion. Use flat side of small blade screwdriver. Take care not to slip and damage teeth. Push gear down shaft till just above motor mount screws. If touching screws, just pry gear back up shaft just enough to clear the screws. |